Line-up

Why?
- Line-ups ask students to share where they stand on a controversial issue. This tells you the range of views in the room.
- The discussion helps students generate their own questions to address in the whole group.
- Line-ups need only take two minutes and require minimal preparation.
- They work even with larger groups.
Suggestion: Use blank colored paper to indicate the ends of the line, then show the statements on screen in text of the matching color and towards same side of the room as the paper.
When?
- At the start of a class as a precursor to a discussion or to another activity (especially a fishbowl).
- Midway or at the end of class to gauge views after a discussion.
How?
Devise two opposing or extreme statements on a (potentially controversial) topic. For example:
| Extreme statement 1 | Line-up continuum | Extreme statement 2 |
|---|---|---|
| Climate change is the greatest threat to humanity |  |
Climate change is insignificant compared to war |
| Method X is most appropriate to solve a problem | |
Method Y is most appropriate to solve a problem |
| Monetarism has greatly damaged the US economy | |
Monetarism has saved the US economy |
Tell students which end of the room represents which statement (you might want to print/write the statements on paper to stick on the walls) and get them to create a physical line between the two in such a way that they are standing at the point that reflects their own view between the two statements.
Students need to talk to one another on the line to find out if they are in the right place, so this should generate lively discussion. If you find students clustering in agreement, then change aspects of the dimension or introduce a new variable, and have students consider subtler issues. For example, students are likely to change their position in the line in response to these economics line-ups:
| Extreme statement 1 | Line-up continuum | Extreme statement 2 |
|---|---|---|
| Monetarism has damaged the US manufacturing base | |
Monetarism has saved the US manufacturing base |
| Monetarism has damaged the US public sector | |
Monetarism has saved the US public sector |
Source: Gibbs, G. (1995). Discussion with more students. Oxford Centre for Staff Development.
Download as PDF
One-page summary
Fishbowl

Why?
A fishbowl allows for an intense, focused discussion on any topic you choose.
When?
- At any point in the class, depending on the purpose you are trying to achieve.
- If you are seeking debate, then use a line-up activity first so you can pick students with differing views.
How?
Organize a small circle of chairs (the “fishbowl”) to be occupied by students who will have a discussion, while the rest of the class either sits or stands in a larger circle around them, listening to the discussion (Figure 1). Be sure to have your discussion question(s) or topic(s) for the group ready in advance.
Figure 1: Initial configuration
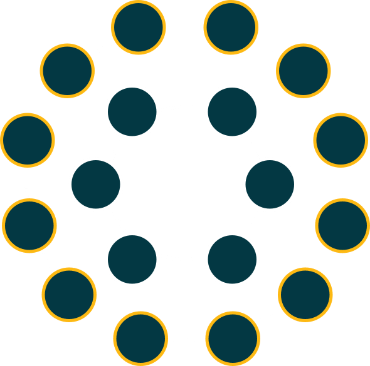
You can ask for volunteers to sit in the fishbowl; more extroverted students will likely agree, and it should lead to a lively discussion. More introverted students probably would not have readily joined the conversation anyway and at least have a more intense discussion to listen to. (You can also choose students if you prefer.)
If you want the outer circle members to be able to join in, then you can introduce a policy where they can “tap out” a student in the fishbowl with a tap on the shoulder and switch places (Figure 2). This allows students to join the conversation if they want to, and also to remove people who are dominating the discussion.
Figure 2: Configuration after the first switch of students
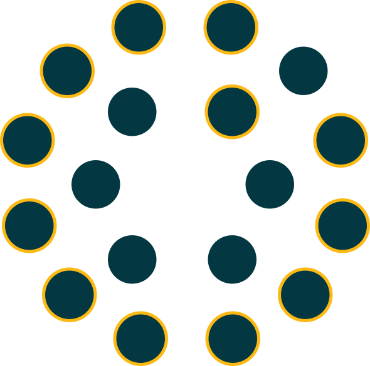
You can add further rules to suit your purposes, for instance:
- No one can be tapped out until they have spoken once.
- No one can rejoin the fishbowl until everyone else has spoken.
- Each speaker needs to say something positive about any comment before they refute it.
In a further variant, you split your students into three equal groups and assign three different readings before class. To start the class, Group 1 is in the fishbowl for 10 minutes to discuss its reading and what they understood from it, then the outer group is allowed to comment for a couple of minutes. Group 2 now sits in the fishbowl and the process continues.
Fishbowls can be sustained for a long time (say, 20 minutes), particularly if the question you pose is complex or contentious. It’s also helpful to have a series of increasingly tricky questions so that you can move the discussion along if the conversation runs dry or if the students appear to have resolved a previous question.
Sources:
Gibbs, G. (1995). Discussion with more students. Oxford Centre for Staff Development.
Vaughn, M. (n.d.). Fishbowl. Handout for faculty at Elon University, Elon, NC.
Download as PDF
One-page summary
Circular interviewing

Why?
- Circular interviewing has the advantage of making students focus on each other. In comparison, rounds (see separate document) tend to lead students to address the professor each time.
- This activity also requires full participation, and everyone’s voice is heard.
When?
- More useful early in a class as a way of prompting further discussion as a whole group.
- Be careful about timing: If you do this with a larger group, then it can take a long time and may become dull.
- Also note that it gets harder for students to come up with good questions as they move around the circle. While tricky, this may prove a good way to generate thought-provoking discussion questions for later in the class, rather than discussing only more basic questions that are easily resolved.
How?
Organize your students into a circle (either the full group or a subset if you want to shorten the activity).
One student (number 1 in the figure below) interviews the student opposite (number 7 in the figure) about an agreed topic for a minute or two. The roles then rotate one place clockwise such that student 2 interviews student 8. Continue rotating until everyone has taken both roles.
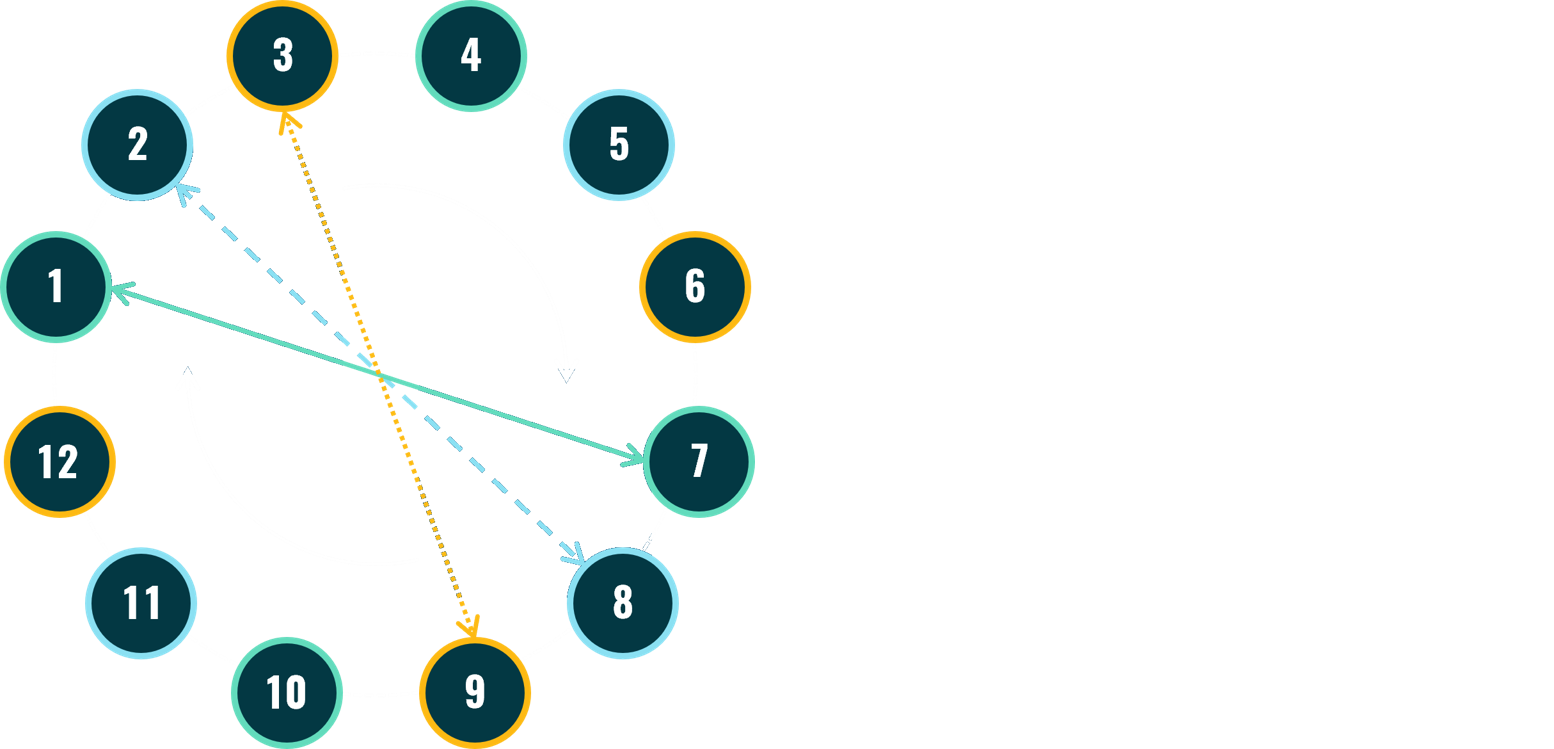
Circular interviewing can involve themes such as:
- Find out what the interviewee has read that throws light on…
- Find out what the interviewee would really like to discuss today.
- Find out what questions the interviewee would like to be answered today.
Source: Gibbs, G. (1995). Discussion with more students. Oxford Centre for Staff Development.
Download as PDF
One-page summary
3. Activities to help students construct knowledge together
Try one of these activities:
- Cross-over or jigsaw
- Poster tour
- Pyramid or snowball
- Send-a-problem
- Syndicates
Cross-over or jigsaw

Why?
- Jigsaws/Cross-overs require ALL students to play the role of rapporteur, rather than having one spokesperson, so engagement levels are typically higher.
Note: You have to do a little doubling-up if the number of students isn’t divisible by three. Plan this in advance of the session so that you are prepared.
When?
- Jigsaws/Cross-overs may take 45–60 minutes. Think carefully about how much material they will need to digest, how much time they’ll need to prepare in their home groups and present in their learning groups. (Bear in mind that most of us tend to underestimate the time needed.)
- This activity also works for debriefing syndicates and other group-work activities.
How?
Divide your lesson material into three chunks. Then split your students into three home groups, numbered 1, 2, and 3 in Figure 1 below. (Groups should have no more than six students, so if your class has more than 18 students [3 groups × 6 students], create smaller groups called 1a, 1b, 2a, etc.)
Each group is responsible for learning one of the three chunks of material – and for teaching that material to students from the other home groups. That material could be reading, podcasts, videos, and so on. Ideally, students would have read/listened to/watched the material before class.
Figure 1: Home groups

In class, give each home group time to work together to share understanding of the material and prepare to explain it to students who are unfamiliar with it. At the end of the allotted time, students cross over into learning groups. Each group comprises one member from all the home groups (Figure 2).
Figure 2: Learning groups

Students from each home group now have an equal amount of time to teach their material to their learn group. Remember to keep time and tell students when to switch to the next person. Circulate the room to check on understanding. At the end, you can review further or clarify misconceptions with the whole group.
Sources:
Gibbs, G. (1995). Discussion with more students. Oxford Centre for Staff Development.
Vaughn, M. (n.d.). Jigsaw. Handout for faculty at Elon University, Elon, NC.
Download as PDF
One-page summary
Poster tour

Why?
- Posters can be quick and effective for sharing findings, especially when groups have been doing different things.
- Since this format it used for sharing research at many academic conferences, students will also be practicing a useful academic skill.
When?
At the end of a group task.
How?
In groups, have students work on a task that they need to report back on via a poster (either on a flipchart sheet or whiteboard). Examples include:
- Report on your lab experiment results.
- Present your own legal arguments for and against viewing corporations as people.
- Summarize your reasons for viewing Midnight’s Children as a picaresque novel (group a)/ a Bildungsroman (group b)/ a magical realist novel (group c).
- Distill the key points from the Enron case study you read.
- Propose a more efficient process for collecting this type of data.
Alternatively, you can use a poster as a way of feeding back on another activity (e.g. a syndicate or pyramid).
Once posters are completed and posted on the walls, students simply tour them. To add interactivity to this segment, you could:
- Have one member of each group stay with their poster to answer questions.
- Put blank paper next to each poster so that others can pose questions or comments and the creators of the poster can respond to them later.
Source: Gibbs, G. (1995). Discussion with more students. Oxford Centre for Staff Development.
Download as PDF
One-page summary
Pyramid or Snowball

Why?
- Pyramids or snowballs can be a successful way of leading into a larger group discussion.
- The initial stage can help more introverted students participate.
- Students do the vast majority of the intellectual work once you have devised the right set of questions to lead them. This can be satisfying to observe. At the same time, it may make you feel redundant; it’s worth reminding yourself that if they are engaging with the material, then they really are learning more.
When?
- A snowball or pyramid could take a large chunk of your class time.
- Be careful not to overuse this method without varying it.
How?
Pyramids, also called snowballs, involve students working solo, then in pairs, then fours (or sixes), and finally as a whole group in a plenary.
A key part of your task as the instructor is to create instructions for each stage and facilitating the plenary portion. You may want to make the questions you pose at each stage build on one another so that you move, for instance, from the concrete to the more abstract, from the simple to the more complex, from small-scale to large-scale, etc.
Solo
 5 minutes:
Working alone might involve reading a case study or other text or starting to solve a problem. It lets students generate some ideas on their own and have material to discuss before pairing up.
Pairs
 15 minutes:
Pairs can risk being exploratory and tentative without being “exposed” to the whole group. The ideas from the solo portion start to grow.
Small groups
 30 minutes:
Most of the real work happens in the fours or sixes. These groups are a good size for involving everyone and developing a range of views. Students typically feel open to sharing their ideas because they have tested them already in their pairs.
Whole group

10 minutes:
In the plenary portion, which involves all the groups, you can pool ideas from each of the groups in turn or can have an open discussion. This works in groups of up to about 24, though they might feel more mechanistic with larger groups.
Students want to know a little about what the other groups think, but not too much; and students who volunteer to speak might not say anything too illuminating. On the other hand, they do provide the instructor the opportunity to take the discussion to a higher level and to challenge the students’ ideas.
Source:
Gibbs, G. (1995). Discussion with more students. Oxford Centre for Staff Development.
Download as PDF
One-page summary
Send-a-problem

Why?
Send-a-Problem engages everyone in problem-solving and can be a good form of rehearsal or practice for the kinds of problems students will face in graded assignments.
When?
At any point in the class. This activity will take some time, especially if the questions are complex.
How?
Stage 1
Divide your students into groups. Hand each group a folder or envelope with a problem written on the outside (Figure 1). Each group has a different problem related to the topic you’ve been working on in class. The groups then have to generate as many solutions or answers to the problem as possible and to write them all down. At the end of the allotted time, they put their responses in the envelope and pass it to the next group.
Figure 1

Stage 2
With a new problem to resolve, each group repeats the previous activity without looking at the previous group’s suggestions (Figure 2). At the end, they put their solutions into the envelope and pass it to the next group.
Figure 2

Stage 3
In the final stage, the envelope is with a third group (Figure 3). This group opens the envelope, reviews the previous groups’ solutions, consolidates them where necessary, and adds any new ones it thinks of. When the students have finished, reconvene the whole class to review, further discuss, or prioritize the solutions.
Figure 3

Source: Vaughn, M. (n.d.). Send-a-Problem. Handout for faculty at Elon University, Elon, NC.
Download as PDF
One-page-summary
Syndicates

Why?
- Syndicates allow students to work on complex problems in groups with a degree of assistance from the instructor.
- They can be a good way to promote students’ higher-order thinking and problem-solving skills.
When?
Typically this will take a full class session. A syndicate might be a good practice run for an assessed group task or individual assignment.
How?
Syndicates are when teams of students are working in parallel (and sometimes in competition with one another) on the same task: analyzing a case, studying an artifact, preparing a proposal, and so on.
At the end, teams usually present the outcome of their work to the whole group. A competitive element to completion and presentation of the groups’ work may increase some students’ motivation and engagement with the activity.
Your role is to design suitable tasks for students to work on in teams of up to eight (four to six is more ideal), and to brief the teams clearly. Your students may need additional materials or resources to complete the task, so have those ready, too.
Ensure that there is one empty chair at the board end of each table (the circles outlined in green in the figure below) so that you can easily join each group without disrupting them and so that the group can see the board more easily. You then circulate around the room and join a group as needed.
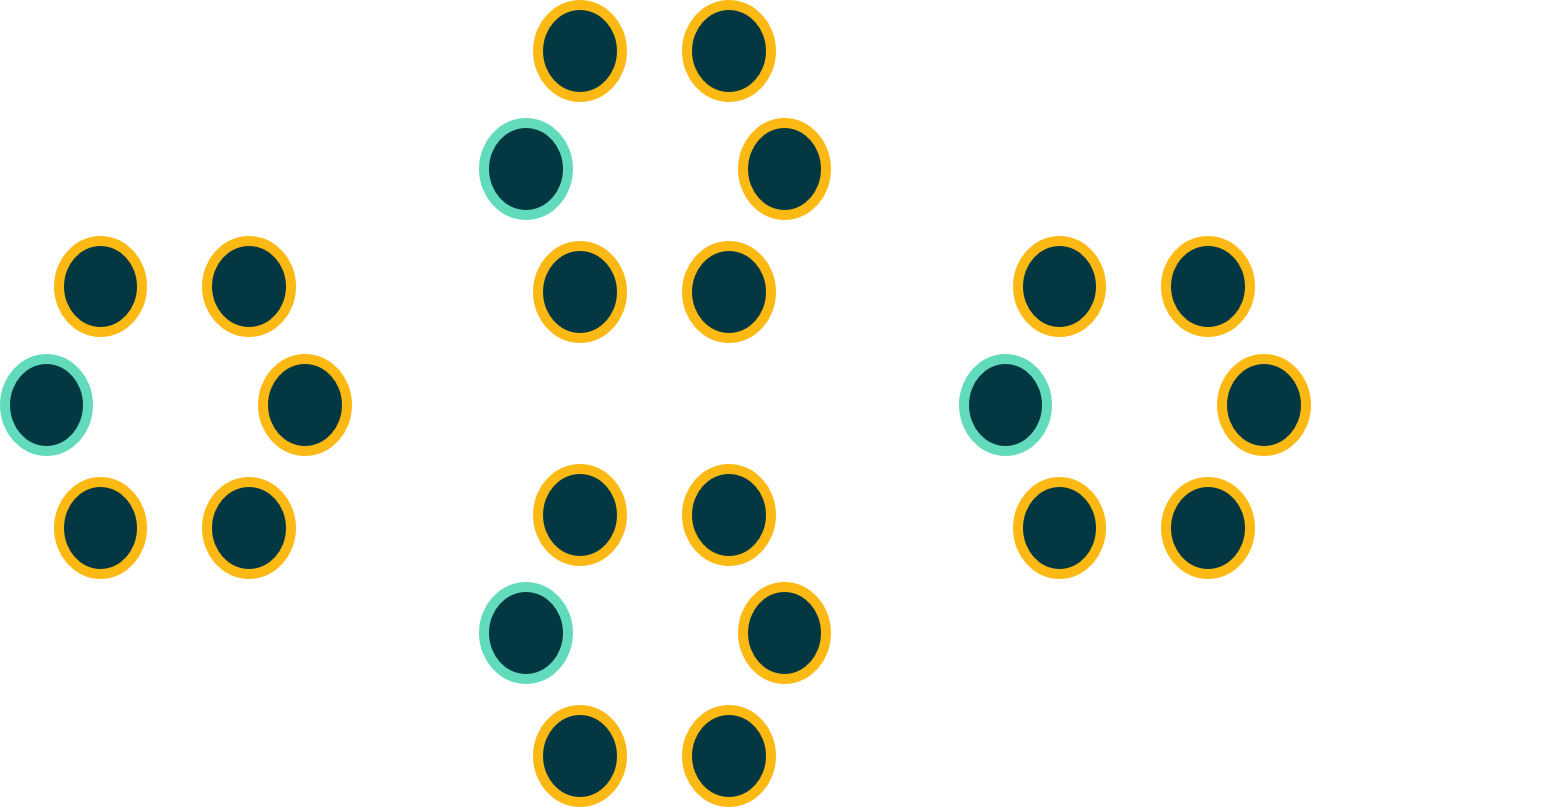
Presentations at the end can be a risk. To avoid a dull sequence of samey or poor oral reports when teams present their conclusions/ analyses/designs, etc., consider a different format (such as poster presentations or a pecha kucha limited to 5 or 6 slides), or use another active learning technique for sharing the groups’ output, such as a fishbowl or a jigsaw/cross-over.
Source: Gibbs, G. (1995). Discussion with more students. Oxford Centre for Staff Development.
Download as PDF
One-page summary