
The TinyMCE text editor in TerminalFour is similar to any other word processor, with a few added extras.
Basic editing features
You can use the text editor to add and edit text, insert images, add links, create bulleted lists, create tables, and spell check your content before it’s published.

Cut, Copy and Paste
Cut, copy and paste are all under the Edit menu, but you can also use keyboard shortcuts: On PCs: Ctrl+x (cut), Ctrl+c (copy), Ctrl+v (paste); on Macs: Command+x, Command+c, Command+v.
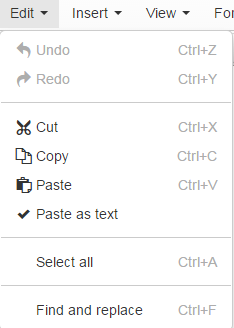
Use "paste as text"
When you paste in content from a Word document, another website, or other source, you're not just pasting in the text, you are also pasting in the formatting from the source.
This causes consistency problems on the website when the source formatting is different from the built-in text formatting/styles.
You should always select the "paste as text" option under the Edit menu before you paste in content from another source so that it will strip out the source formatting before adding it to TerminalFour.
Formatting Text
Apply text formatting using the Format menu. Highlight the text you wish to add formatting, and then select bold, italics, or apply headings:

Remember: Headings are very important for accessibility and search engine optimization, in addition to helping to make your page more skimmable.
Refer to our web content guidelines and tips on writing for the web if you have questions about when, why, and how to write and apply headings.
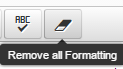
You can also get rid of headlines, bolding, bulleted lists, etc. by highlighting the text and selecting Remove All Formatting.
Inserting Links
In the Text Editor, you can insert section links (links to a section or page of the Seattle U website), content links (a specific piece of content on a page), or an external link (a page outside the Seattle U website).
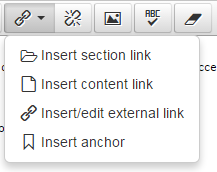
Insert Section or Content link
- Select Insert Section Link or Insert Content Link
- Navigate through the site structure to find the section, and click the name of the folder
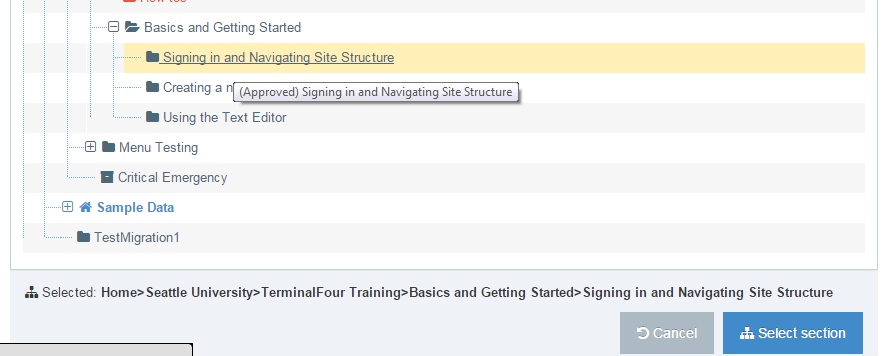
Then scroll down to the very bottom of the page to click "Select section."
If you are inserting a content link, there will be another pop-up window which will ask you to select the content item.
Insert/edit external link
Please note: Please do not insert links to Seattle U websites using "insert/edit external link." You should use section links or content links when linking to Seattle U websites whenever possible. This will help prevent 404 errors for users.
- Select Insert/edit external link
- In the pop-up window, fill in:
- URL (e.g. http://www.ajcunet.edu/)
- Text to display
- Enter the link text as you'd like it to display on the page (e.g. Association of Jesuit Colleges and Universities)
- Title (optional)
- Usually the same as text to display
- Appears as a pop-up when you hover over the link
- Target
- None (default): This will open the page in the same window
- New Window (recommended): this will open up a new tab in the browser
Buttons
You can insert buttons onto your page to highlight calls to action for your users (“Give,” “Contact Us,” etc).
To add a button: Click the Insert > Button and then select the button you’d like to use: Attention/Red; Chevron; or Arrow.
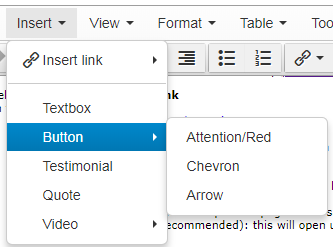
In the pop-up, fill out the button text (keep it short!) and link you’d like to use with it.
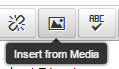
Adding Media: Images or links to documents, files
To add images or insert links to documents or files in your content item:
Select “insert from media” button (which looks like a little picture of a mountain).
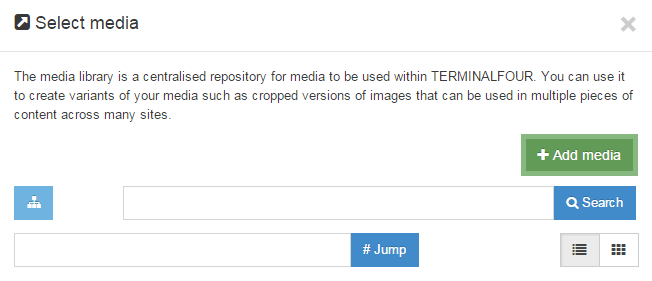
Adding media that is already in the Media Library
- Click on the "Categorised" folder to expand all the subfolders (if not already expanded).
- Navigate to the folder in which your media item has been placed.
- Click on the folder name to see all the media stored in that folder.
- Click on the title of the media item you wish to add to your content.
- If an image, you will be asked to select a size variant to add
- If a PDF or similar file type, a link will be added to your content.
- To change the link text, double-click the newly-added link and type in the new link text. Simply typing over the link text will not work.
Adding new media files that are not already in the Media Library
- Click the green "+ Add Media" button at the top right.
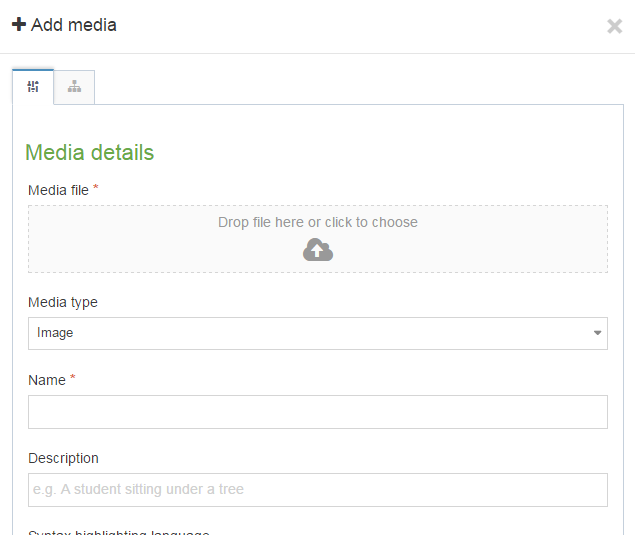
- Click inside the grey box to select a file from your computer, or drag and drop the file into the media file area
- The "media type" should automatically change depending on the file type you added
- Add a name for your media item
- If this is a PDF or other file, the name becomes the default link text
- Add a description
- If this is an image, the description is crucial for accessibility as the description is read aloud to users using assistive devices, such as screen readers, to navigate your website
- Description of the image should convey the meaning of the image to someone who can't see it
- If this is an image, the description is crucial for accessibility as the description is read aloud to users using assistive devices, such as screen readers, to navigate your website